
Estimated reading time: 10 minutes
Version info
Branch: Master
Date: 18.03.2025
Version: 2025.01
General
Changed Communication Protocol: HTTP to HTTPS
Both the WebApp and the robot's API now use HTTPS for all communications, enhancing security. Customers must now access the robot using https://10.0.0.1 instead of http://10.0.0.1.
When accessing this page for the first time, your browser may display a warning indicating that the connection is not secure. This happens because the browser requires a certificate, which has not yet been installed. Despite the warning, the connection is now significantly more secure than before.
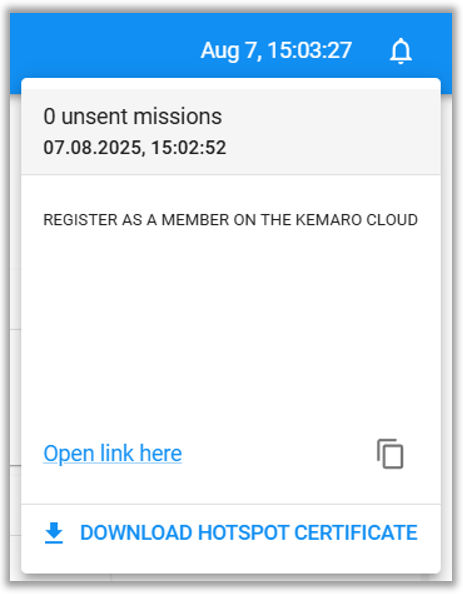
To resolve the warning and avoid it in the future:
- Tap on the
 icon in the top-tight corner in the WebApp and download the certificate.
- Install the certificate in your browser. Check the HTTPS Certificate Guide for a step-by-step explanation on how to do that.
If you do not have the certificate and still wish to proceed, you can:
- Click on Advanced.

- Select the option Proceed to 10.0.0.1 (unsafe).

This change ensures better data protection and aligns with modern security standards.
Updating is stuck, what should I do?
Due to upgrading to HTTPS connection, updating from the configuration page may appear stuck. Once the update is completed, which is typically signaled by the LED buttons on the robot no longer flashing in a rotation pattern, simply refreshing the page will switch your connection to HTTPS.
Navigation
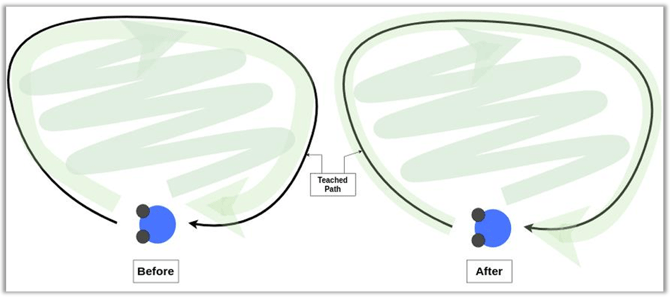
Teach & Fill-In cleans at borders
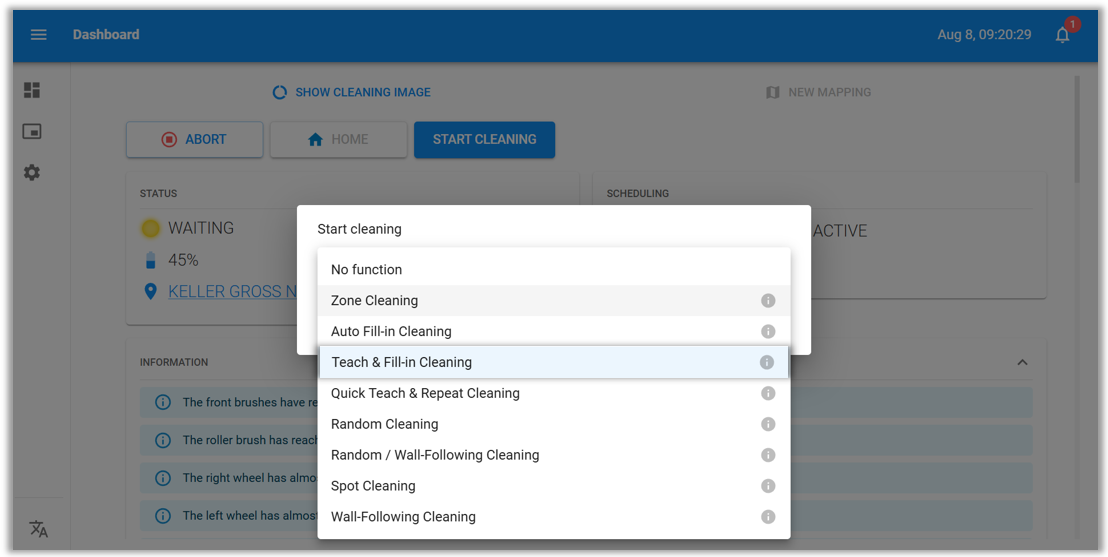
The teach & fill-in cleaning mode (formerly DEMO Mode Cleaning) now cleans a more intuitive area, meaning that it also cleans the path where the robot was driven during the teaching segment and not just inside this area.
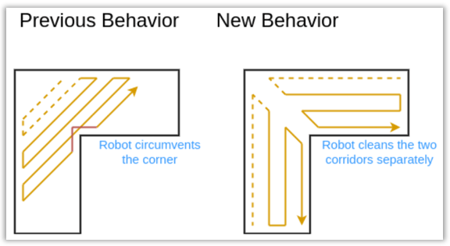
Auto Fill-In Cleaning
The robot will clean a segment/subzone with higher efficiency, by always cleaning along the direction of an aisle or corridor.
More Efficient Mission Planning
Mission Exploration
Remapping/exploration now only happens once per zone per mission. In other words, if a mission is performed and cleaned multiple times the robot only remaps the area the first time.
Mission Planning
The robot now keeps track of which zones, and sub-zones have already been cleaned during a scheduled run, even if it needs to recharge mid-session. As a result, no sub-zone will be cleaned twice within the same run.
Teach & Repeat with adaptive distance from objects
While teaching a path, the robot will keep track of obstacles, objects, and walls close to it. When repeating the path, the robot will not keep a large distance from recorded obstacles/objects/walls. On the other hand, the robot will keep a safe distance from new obstacles/objects/walls that were not present during the teaching process when repeating the path.
Precise navigation
The robot now moves with more precise cornering and improved navigation in wall-follow mode. This enhancement allows it to stay closer to walls while keeping smooth and accurate movement.
Room initialization
With this release, the map and its corresponding room configuration (e.g., no-go zones) are loaded during the robot's boot-up rather than upon the first cleaning command. As part of the boot-up process, when positioned in front of a charging station, the robot automatically moves back 50 cm to detect the station ID and initialize the correct map. If no cleaning schedule is active, the robot then re-docks. During the entire boot-up sequence, all HMI LEDs flash. The robot should not be manually moved (via remote control or trolley handle) during this process.
Obstacle avoidance
Avoidance of small objects that could previously not be distinguished from dirt is now improved. The robot navigates around it quicker and more efficiently. Robots equipped with the new frontal 3D sensor can detect these low obstacles with even greater precision.
WebApp: New INTERACTION REQUIRED robot state
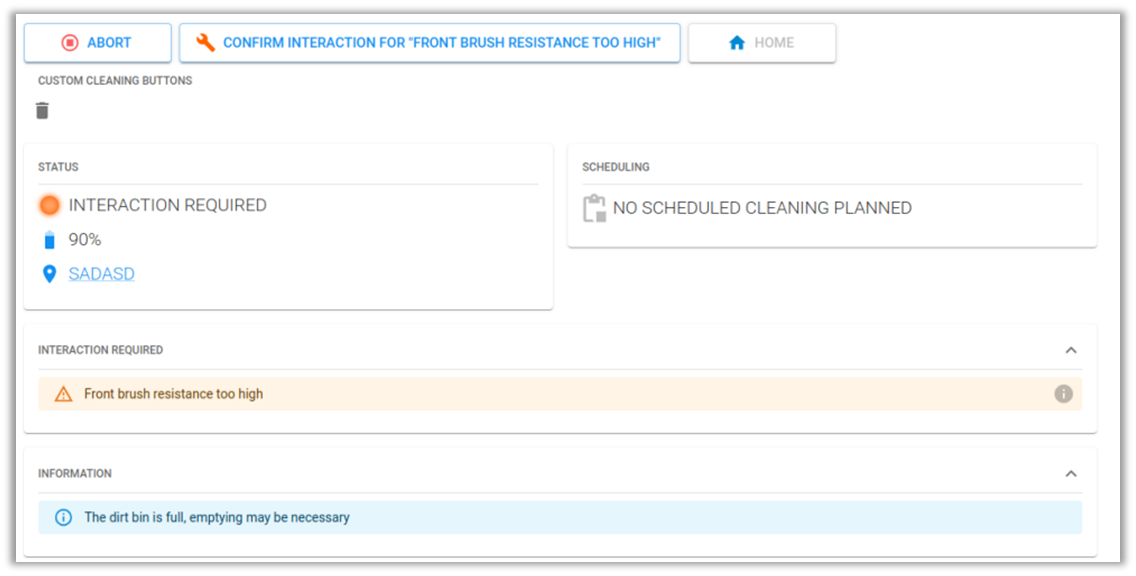
A new robot state, Interaction Required, has been introduced. When triggered, it is shown by a flashing orange wrench LED on the robot's HMI and is also displayed in the WebApp. Normally the robot is stopped until the cause of the issue is resolved by the user.
How it works:
- When the robot enters the Interaction Required state, the user must check the WebApp to view the specific issue code and take the necessary action.
- Once the issue is resolved, the Interaction Required state can be confirmed in the WebApp, allowing the robot to resume cleaning.
Typical interactions are:
- Untangling an object from the brushes;
- Bringing the robot back to the station;
- Emptying the dirt bin.
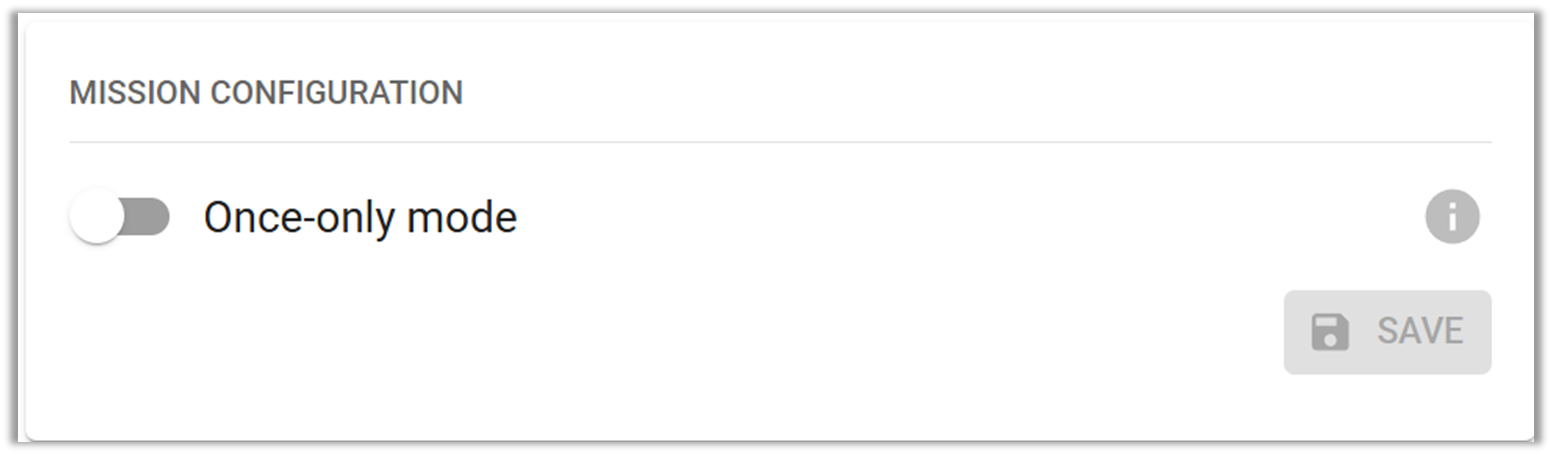
WebApp: Once-only mode
A new setting, Once-Only Mode, has been introduced. When enabled, the robot will return to the charging station after completing all scheduled zones once. When disabled, it will continuously cycle through the scheduled zones, restarting from the first zone after completion - maintaining its earlier behaviour. The Random navigator is not affected by this mode.
Click here to learn more about once-only mode.
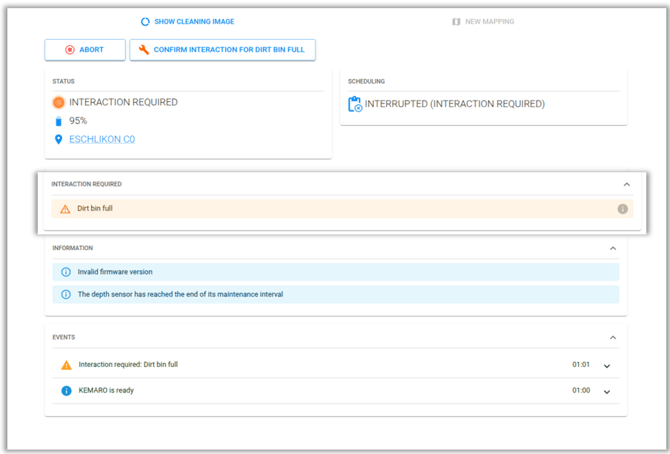
WebApp: INTERACTION REQUIRED - Dirt bin full
When the dirt bin is determined to be full an interaction is required. After manually emptying the dirt bin, the robot will only start cleaning again after the user clicks the CONFIRM INTERACTION button or by pressing the STOP button on the robot for at least 3 seconds.
Click here to learn how to enable the notification.
WebApp: Teach & Repeat without a room
Teach & Repeat can now be activated without requiring a predefined room or station. Similar to Teach & Fill-In, if the robot is docked, it will undock and wait for the remote control (RC) to be activated. A path can then be recorded using the RC, after which the robot will follow the path once and return to the starting position. The recorded path is not saved.
Click here to learn more about Teach & Repeat mode.
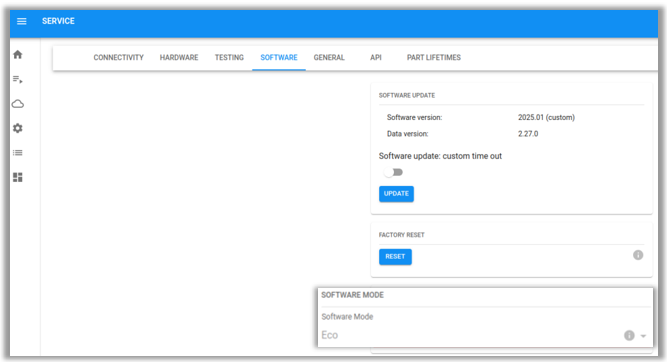
Factory reset
Robots can now be factory reset directly from the Service App. To do this, navigate to System > Software and select RESET. All configurations except hardware configuration will be deleted from the robot.

After confirming, the user will need to reconfirm the reset, to ensure it is intentional and not a miss-click.
Room-Specific button configuration
Cleaning buttons on the robot can now be individually configured for each room. While default settings remain unchanged at the robot level, you can now customize button functions per room - for example, assigning a different action to Button 1 in Room A than in Room B.
Click here to see how to configure buttons to specific rooms.
Part lifetimes
The Service App now includes a PART LIFETIMES tab, which provides a detailed overview of the robot’s replaceable components and their wear levels.
Key features:
- A wear indicator bar visually tracks each part’s lifespan:
- Green → Normal condition
- Orange → Nearing end-of-life
- Red → Requires immediate replacement
- An alert will appear on the dashboard when the part is nearing end-of-life.
- When a part reaches the end of its lifecycle, it should be replaced to maintain optimal cleaning performance. Nevertheless, the robot still continue to run.
- In case the part is still considered to be in good condition, the lifetime can be extended by clicking the arrow button on the right side of the wear indicator bar.
Click here to learn more about monitoring parts´ lifetimes.

Red zones live update
Restricted zones can now be created or modified in real time, even while the robot is actively cleaning. The robot immediately recognizes any changes made to restricted zones.
Be aware: Avoid placing a restricted zone directly over the robot, as this would prevent it from moving.
Continue mapping after moving the station
Continue mapping is now supported even after relocating the station within the Zone Planner.
K900 ECO and Cleaning Area Limit
KEMARO robots are available in two main configurations: Smart/Top and ECO. Among other differences, the ECO version is limited to a cleaning area size of 2500m² per room. The robot version can be seen in the Service App. It may not be changed after delivery.
Users can manually adjust the cleaning area limit during the mapping process, when uploading a room (see Room Download and Upload), or within the Zone Planner of an existing room.
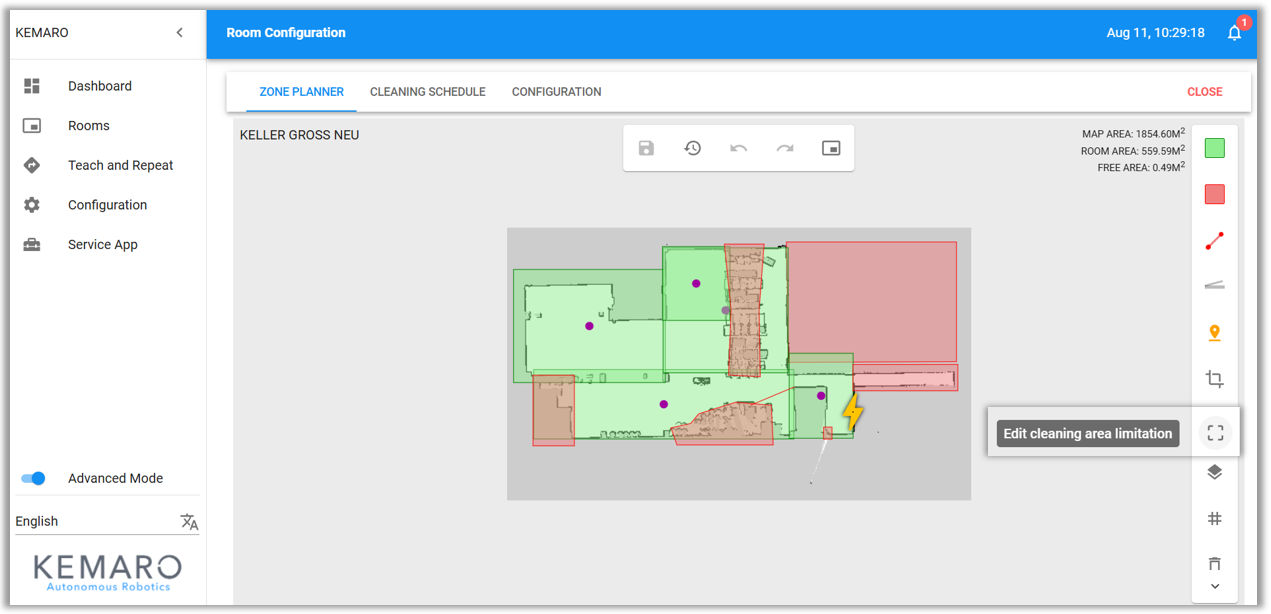
Room limit visualization & editing
The cleaning area limit is displayed similar to cleaning zones and can be modified. In Rooms > Zone Planner, the light area stands for the accessible space within the room limit, while the dark area indicates non-reachable space outside the limit. The total surface area of the room limit is displayed in the top-right corner as Cleaning Area Limit. If the 2500m² limit is exceeded, the area indicator turns red, and the room cannot be saved - trying to do so will result in a validation error.To edit the room limit:
- Enable Advanced Mode from the left sidebar.

- Click Edit cleaning area limitation to modify the room limit zone.

- Adjust the boundaries as needed, just like other zones. Select APPLY and then save the changes.


Don´t forget to save the changes in the Zone Planner as well.
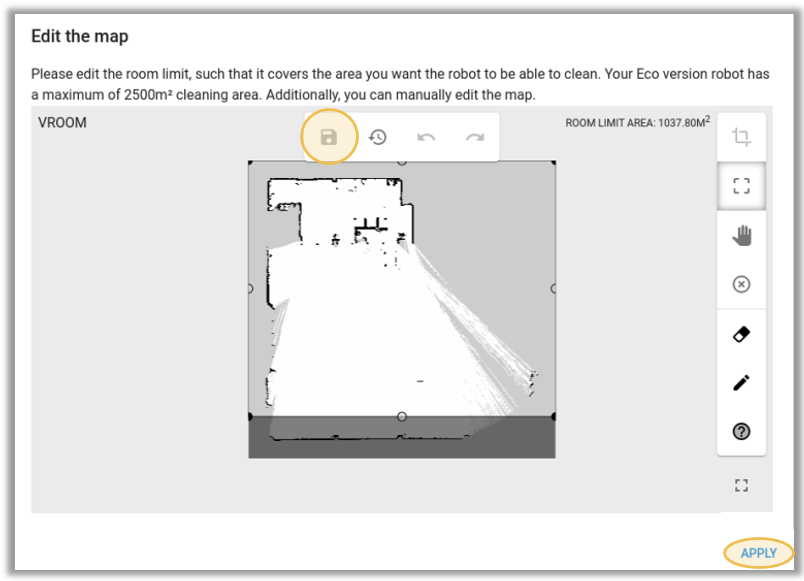
For ECO robots, an added mandatory step is needed in the mapping process once the first mapping is complete. During this step, the cleaning area limit can be reviewed and adjusted before completing the process.
The same applies when uploading a room before the upload is completed, the cleaning area limit must be configured to ensure it follows the 2500m² restriction.

Room download and upload
Rooms can now be exported and transferred between robots via the WebApp. A room can be downloaded as a ZIP archive and then uploaded to another robot, making it available for configuration and cleaning.
Click here to see how to download and upload the map and learn about files compatibility and restrictions.
Activate current schedule
It is now possible to activate the current schedule after an interruption by pressing a button in the Dashboard page of the Web App.

Figure 24: Button to activate current schedule after schedule has been manually cancelled.
The button is available only when applicable, specifically when an active schedule exists for the current room and has been interrupted either manually (e.g., by pressing the Abort button) or due to an Interaction Required state that has been confirmed.
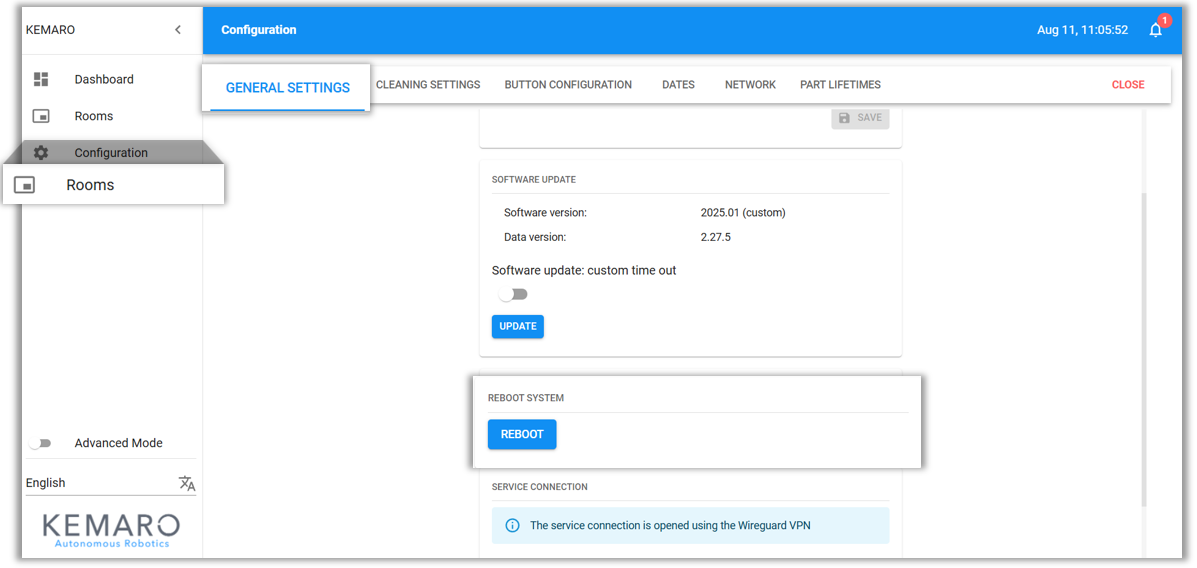
Reboot system
A Reboot System button has been added to the Configurations page, allowing users to restart the entire system.
To reboot the system:
- Pressing the button triggers a confirmation popup with Confirm and Cancel options.

- Selecting Confirm starts the reboot, while Cancel aborts the process.

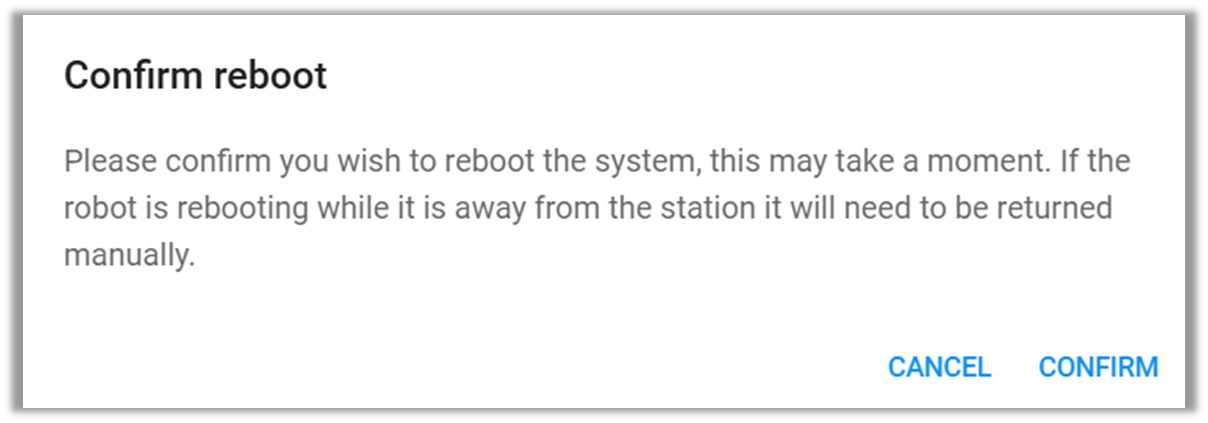
Once the reboot begins, it cannot be stopped, and the connection to the robot will likely be lost temporarily.
WebApp behaviour during reboot: While the reboot loads, do not refresh the WebApp.
Once the robot is back online and reconnects, the loader will disappear, and the robot will be ready for use.
RC Usage reported on Cloud
When the robot is operated using the remote control (RC), it now reports this activity to the cloud. A report is created each time after the RC is deactivated.
Click here to download software release notes 2025.01 Master in a PDF.
More questions? Contact us at support@kemaro.ch!
